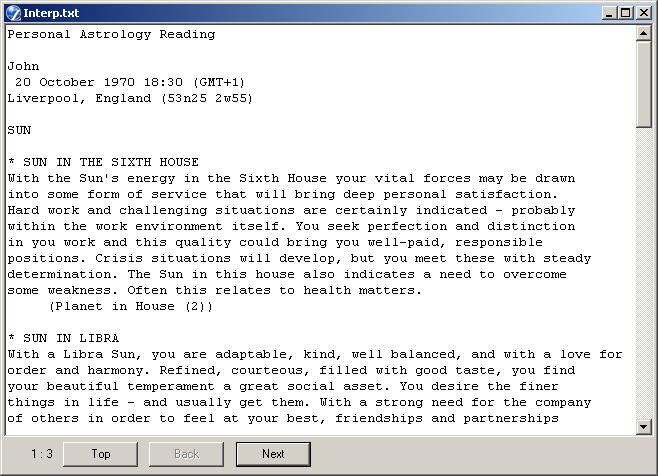
Your First Horoscope
You have just run ZET for the first time. Naturally, you want to see your own horoscope. This is what to do:
 "Data"
button on the Toolbar. (If the Toolbar is invisible, select "Horoscope" from the main menu,
then "Event Data..." - or hit F3). Notice how you get a popup hint when you pause
the mouse pointer over a button - this help tooltip is available for most tableau
objects and icons.
This brings up a window for you to enter birth details.
It is the Event Data window - the place where you will most often
input dates, times, and places for creating ('casting' or 'erecting', as astrologers say) horoscope charts.
A blinking vertical line shows which entryfield your typed text will go into.
"Data"
button on the Toolbar. (If the Toolbar is invisible, select "Horoscope" from the main menu,
then "Event Data..." - or hit F3). Notice how you get a popup hint when you pause
the mouse pointer over a button - this help tooltip is available for most tableau
objects and icons.
This brings up a window for you to enter birth details.
It is the Event Data window - the place where you will most often
input dates, times, and places for creating ('casting' or 'erecting', as astrologers say) horoscope charts.
A blinking vertical line shows which entryfield your typed text will go into.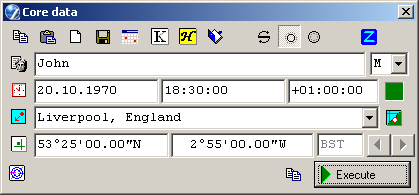
 "Open Atlas" button.
The Atlas window appears, from which you
can quickly obtain the geographical
coordinates (and other required data) of the city where you were born.
"Open Atlas" button.
The Atlas window appears, from which you
can quickly obtain the geographical
coordinates (and other required data) of the city where you were born.
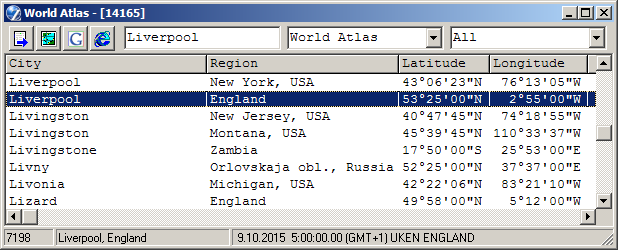
Select "World Atlas" and "All" from the middle and the right drop-down lists respectively. Then click in the left field at the top of the window and type the first letters of the name of a city, for example, liverp. In the cities list the blue highlighting bar should jump to the Atlas entry for Liverpool, England. If not (say you see instead 'Liverpool, New York, USA'), use the cursor keys to look thru the Atlas for your city. If your place of birth is not in the Atlas, you can try looking in the larger atlas: select your country from the top-right drop-down list, then select "World Atlas II" from the middle list. If this does not contain your place of birth either, for now choose the nearest large town - you can edit the Atlas later.
To select a city, double-click on the highlighted line, or press the Enter key. The Atlas window is closed, and you revert to the Event Data window, in which you can see that your selected city, its latitude (North or South of the equator) and longitude (West or East of Greenwich), and any time difference (if applicable - in the field labelled "GMT") have all been entered automatically for you.
Time difference - or Time Zone - is the number of hours by which local civil time at a place is ahead of (or behind) Greenwich Mean Time, which is the basis of calculations. For more information about this topic, see Your Location. NOTE: Time Zones are in European format, not American format. Easterly locations are indicated with a '+' sign, those west of the Greenwich meridian with '-'.
TIP: If next time you want this city, there is no need to use the Atlas. Cities that were selected for previous calculations will be recognised if you type their first letters directly in the City field. Or, make your selection from the drop-down list. (This list is called the Operational Atlas).

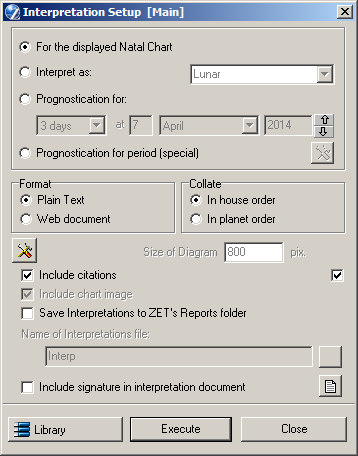
 Text button on the Toolbar or
select "Horoscope" from the main menu and then "Interpretation..." item
to invoke the "Interpretation Setup" wizard:
Text button on the Toolbar or
select "Horoscope" from the main menu and then "Interpretation..." item
to invoke the "Interpretation Setup" wizard:
 "Library" button and proceed.