General Settings
The General Settings window consists of several thematic tabs of options for the operation of the program. The settings are distributed over six tabs: General, Risings, Language, Misc., Character Set and Security.
The General Settings window is opened by:
- selecting "Settings" | "General Settings..." from the main menu, or
- clicking
 "Settings" Toolbar button and
selecting "General Settings..." the menu.
"Settings" Toolbar button and
selecting "General Settings..." the menu.
General tab
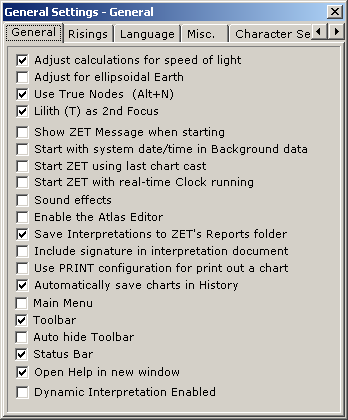
Adjust calculations for speed of light - when checked, the computation of the apparent position of planets and stars includes a factor compensating for the finite speed of light. When unchecked, the calculated coordinates indictate the true positions of planets and stars.
Adjust for ellipsoidal Earth - when checked, geographical coordinates of places on the Earth's surface are adjusted by treating the Earth as an ellipsoid. When unchecked, the Earth is treated as a perfect sphere. Transformation to ellipsoidal coordinates makes the results of calculations more accurate for astronomy - it effectively reduces latitudes by a small amount. Most popular astrological software does not adjust for this factor.
Use True Nodes - various methods can be used to calculate the position of the Moon's nodes. When this option is unchecked, the position is an averaged value. When checked, true positions are calculated, taking into account fluctuations in the lunar orbit owing to several factors.
Lilith (T) as 2nd focus - Lilith or the Dark Moon is either the apogee (”aphelion”) of the lunar orbital ellipse or, for some people, its empty focal point. As seen from the geocenter, this makes no difference. Both of them are located in exactly the same direction. But the definition makes a difference for topocentric ephemerides. This option may be emplemented to the Lilith (True), if you select it from Virtual Planets and Objects list (see menu item under Tables button).
Show ZET message when starting - the ZET Message makes daily-updated announcements about the current phase of the Moon, the lunar day, nearest new and full moons, etc. If this option is checked, the message will be displayed at start-up. (It can also also be displayed by clicking the "Tools" button on the Toolbar, and selecting it from the menu).
Start with system date/time in Background data - checking this option will enter the date and time of the computer's clock into the Background data-set when starting ZET automatically with a dual chart (see also next option below). This assists creating current transit charts.
Start ZET with last chart cast - when checked, ZET searches its History log at start-up for the last computed dual chart, and if one is found, will cast and display the chart. This option works together with the option for setting the date/time from the system clock for automatically displaying current transits.
Start ZET with real-time Clock running - when checked, real-time updating of tableaux will be enabled the next time ZET starts. Displayed data, e.g. the Chart tableau, will be recalculated at 1 second intervals. A chart for the current location will then show you the astrological picture for the current moment. For dual charts, you will see, for example, up-to-the-minute transits for a nativity. (The real-time clock can also be activated and deactivated at any time by clicking the Status bar "Real-time Clock" indicator/button).
Sound effects - when checked, ZET plays auditory cues during start-up and to indicate erroneous data entry, 'jumps' in the Cosmos tableau, throwing coins for the I-Ching Oracle, etc. Appropriate sound files must be present in the [ZET]\Sounds folder, and a sound-card (or equivalent) is required.
Enable the Atlas Editor - when checked, adds the option of the Atlas Editor to the Geographical Map popup menu, so that you can add or edit city data (only for advanced users).
Save interpretations to ZET's Reports folder - when checked, interpretation documents are saved to the [ZET]\Report folder with unique file-names (for ease of sending the horoscope readings to different clients).
Include signature in interpretation documents -
this includes a 'signature' at the end of interpretation documents.
The signature is stored in the file [ZET]\Language\English\signature.txt,
which you can edit.
The signature is inserted at the end of the document automatically.
Use PRINT configuration for print out a chart - when checked, then automatically implements a special configuration, named PRINT.ini, for print out a chart. E.g. if you use a dark chart's background on the screen, then for nornal printing of a chart it need to specify a white background at PRINT configuration. You can create this configuration yourself.
Automatically save charts in History - when checked,
chart data will be recorded in the History log
when the "Execute" button of the
Event Data window is clicked. When unchecked, saving to the History log is performed only when the
Alt+S hot-key is typed.
The recording process is accompanied by an animation - the
 icon is moved to the History icon on the Toolbar.
Main Menu - when checked, the main menu is displayed at the top of the main program window. When unchecked, there is no main menu.
Toolbar - when checked, the Toolbar is displayed on the top edge of the tableau. When unchecked, there is no Toolbar.
Auto hide Toolbar - when checked, the Toolbar remains hidden from view until the mouse pointer is moved to the top edge of the tableau. This option is especially useful in Full Screen mode (F11). When unchecked, the Toolbar is set using the "Toolbar" option above.
Status Bar - when checked, the Status Bar is displayed on the bottom edge of the tableau. When unchecked, there is no Status Bar.
Open Help in new window - when checked, the User Manual is opened in a new browser window. When unchecked, an existing window of the browser is used.
Dynamic Interpretation Enabled - when checked, then the content of plain-text interpretation window of an object will updated while changing data (e.g. time) of current chart. E.g. the text of interpretation "planet in house" will changed when planet moves from one house to another.
Risings tab
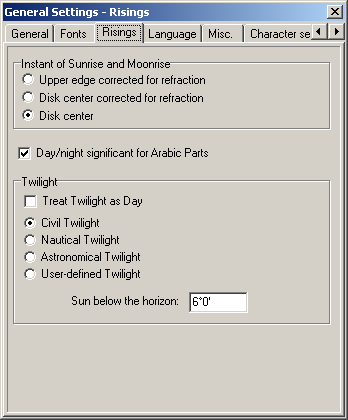
The Instant of Sunrise and Moonrise panel allows you to define the moment of rising and setting of a heavenly body:
- Upper edge corrected for refraction - rising uses the coincidence of the top edge of a planetary disk with the true horizon (sea level), and include compensation for refraction effects. This is the apparent astronomical rising,
- Disk center corrected for refraction - rising uses the center of the planetary disk, and include a correction for refraction. (Atmospheric refraction results in an apparent raising of the position of a star close to the horizon above its true altitude. The accepted value for refraction at the horizon is 34 arc-minutes).
- Disk center - rising uses the center of the planetary disk without refraction correction. This is the conventional astrological rising.
Day/night significant for Arabic Parts - there are two ways of calculating Pars: with or without consideration of daytime or night-time. This setting allows you to select a preferred method.
Twilight panel. In some instances when calculating Arabic Parts it is meaningful to take into account twilight. This panel allows you to select a preferred definition of twilight.
- Treat Twilight as Day: when checked, twilight is taken into account when calculating Pars. Select one of the following twilight options:
- Civil Twilight - i.e. Sun 0°-6° below the horizon
- Nautical Twilight - i.e. Sun 0°-12° below the horizon
- Astronomical Twilight - i.e. Sun 0°-18° below the horizon
- User-defined Twilight - when selected, ZET uses the value in the entryfield Sun below the horizon: as setting the limit on twilight duration.
Language tab
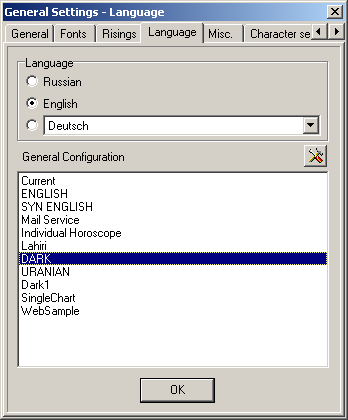
The Language panel allows you to select a language for the user interface. Select first a locale from the options in the Language panel. Then select one of the available configurations from the list below, and click the OK button. ZET shuts down and restarts using the selected language and configuration.
The button to the right of the "General Configuration" label selects the predefined ENGLISH configuration (from the ENGLISH.dfl file), which is the default English language configuration when ZET is run for the first time.
Miscellaneous tab
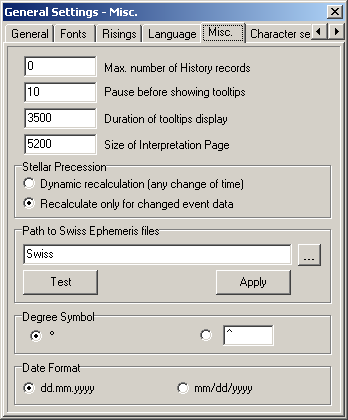
Max. number of History records - sets the size of the History log of previously-computed charts. It is desirable to set this value as large as computer resources allow. When the log overflows, new additions are made by automatically dropping the oldest records from the list. See the History topic for more information. If this value is zero, then the size of list is unlimited (no records are deleted).
Pause before showing tooltips - sets an interval (in milliseconds) after which, if the mouse pointer has not moved off an interactive tableau object, an info panel will be displayed.
Duration of tooltips display - sets the length time (in milliseconds) that tooltip info panels are displayed.
Size of Interpretation Page - sets the number of characters, and thus the page size, of the multi-page window used for displaying interpretations in plain text format. The maximum size is 32000 characters.
Stellar Precession panel - allows you to set how ZET recalculates stellar coordinates in one of two ways:
- Dynamic recalculation (any change of time) - precession is adjusted for automatically whenever a time-dependent calculation is requested or scheduled (e.g. new chart, under Dynamics of Time, at each tick of the real-time clock, etc). When selected, the Star Precession indicator/button on the Status bar displays a red checkmark (tick) on a white background.
- Recalculation only for changed event data - precession is recomputed only when a new chart is erected, i.e. when inputting new event data, or selecting from the Database or the History log. In this mode of operation, stellar precession is allowed to accumulate. When the amount becomes significant ZET displays the Star Precession indicator and button on the Status Line (red star-burst on a black background), and pausing the mouse pointer over it displays the status of the precession, e.g. "Precession has reached 0°0'57 - click to recalculate stars". If updating of star positions is required, click the indicator button. The indicator is removed from display until precession again becomes relevant.
For more information about this topic see Stars.
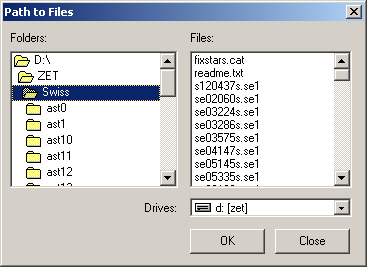
Path to Swiss Ephemeris files - enter a drive letter and folder where Swiss Ephemeris files can be found. If other software (or a different version of ZET) has already installed Swiss Ephemeris data files, ZET can use them if it knows where to find them. This option allows the user to avoid keeping redundent copies of the Swiss Ephemeris on the computer. (ZET's own copies of these files are installed in the [ZET]\Swiss folder).
Click the "Browse..." button to open the following window to select a file path:
Click the Test button to confirm correct operation of ZET when sharing Swiss Ephemeris files on a different path. A window containing planets' positions at a test date is displayed:
1.01.1950 12:00 GMT
Sun 10°30'52"Cap OK
...
If all planets check out OK, click the Apply button to confirm the path to ZET.
Degree Symbol - selects either the standard degree symbol (°) or any other symbol of your choice, e.g. ^.
Date Format - selects between European style (e.g. 27 February 2006) and American style (e.g. February 27, 2006) of date representation.
Character Set tab
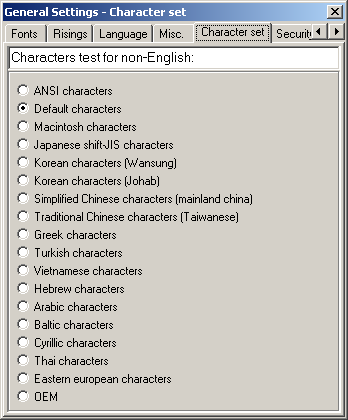
In most cases you should not need to change the setting of this tab. The normal setting is "Default characters". If (non-English) text is not displaying correctly, you can try to correct the display by selecting an alternative character set. You can input problem characters in the entryfield at top of the window to check how they are displayed when different language character sets are selected.
Security tab
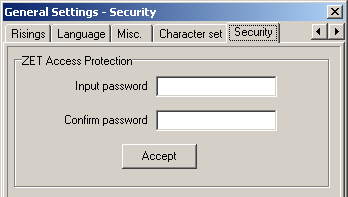
The Geo version of ZET includes protection against unauthorized access. When this is enabled, a password is required to operate the program. To enable or disable secure access, open the General Settings window, Security tab.
To set a password, type it into the Input password entryfield, and again into the Confirm password field, and click the Accept button. A message box "Password has been set" confirms that secure access is in place.
When secure access is enabled, you will need to enter the password when ZET is run (do not forget it).
To disable the password protection, click the Security tab of the General Settings window, re-enter the password to obtain access to the tab, ensure the entryfields are void, and click the Accept button. A message box "Password has been cancelled" confirms that secure access has been disabled.