Virtual Planets and Objects
ZET supports fictitious objects, including the planets of the Hamburg school of astrologers, and symbolic projections, and allows users to define their own. These 'virtual planets' can feature in horoscope charts, aspects, interpretations, etc.
To view the list of objects,
click the  "Tables" Toolbar button
or select "Tables" from the main menu, then
select the "Virtual Planets and Objects" menu option.
"Tables" Toolbar button
or select "Tables" from the main menu, then
select the "Virtual Planets and Objects" menu option.
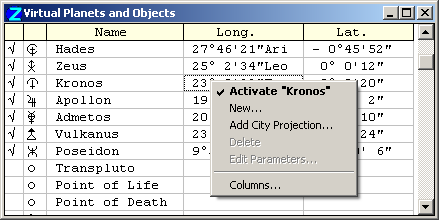
The leftmost columns of the table have the following meaning:
- Column 1: activation checkbox - contains a checkmark (tick) if the object has been selected for use (activated). Click once in the table cell to activate or deactivate the object,
- Column 2: selected glyph.
Right-click in the window to display a popup menu with the following options:
- Activate "name" - activates or deactivates the name object. Activating the object means that it will be treated as a planet, i.e. its current coordinates will be calculated,,
- New... - opens the New Object dialog window in which you enter the computational parameters of a new virtual object. The New Object window is described in detail below. NOTE: there is a limit of 89 on the total number of virtual objects. asteroids, and Arabic Parts that can be added to the routine calculation of planet positions,
- Add City Projection... - opens the Atlas window so that you can select a terrestrial location for projecting symbolically onto the sky. In the Atlas window, position the mouse pointer over the desired city, and from the Atlas popup menu select "Add City to Virtual Objects",
- Delete - if required. Some objects are predefined and cannot be deleted or edited,
- Edit Parameters... - opens a dialog window for editing the computational parameters of the object. This dialog functions identically to the New Object window - see below. For predefined objects, this menu option is enabled only when the mouse pointer is in the glyph cell of the object; it invokes the Glyph Editor, so that the glyph can be edited or replaced,
- Columns... - opens the Column Manager window. You can select which columns will be displayed by marking the checkboxes in the list of column headers. To rearrange the order of columns in the table, click the pair of buttons at right to move the highlighted item up or down the list.
Activating a virtual object means that it is added to the schedule of calculation. To customize its display settings, use the Chart Settings - Planets tab.
The catalog of virtual objects is located in the [ZET]\LANGUAGE\English\Virtuals.lst file.
Special Points
The Virtual Planets and Objects list contains two special points:
- Point of Life - orbital period 84 years,
- Point of Death - orbital period 108 years, contrary motion, i.e. reverse zodiac sign sequence.
The New Object window: 'Easy' mode
Right click in the Virtual Planets and Objects window to invoke its popup menu. Select the "New..." item. The New Object window is displayed.
The same window, but with the title 'Edit Parameters', appears if the "Edit Parameters..." menu item is selected.
Let's examine the object Selena (White Moon):
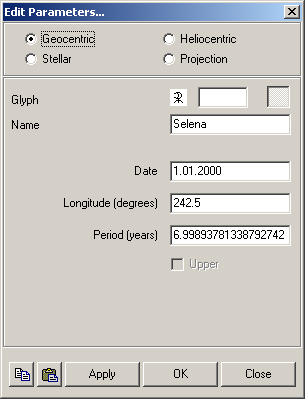
There are two modes of data entry. An 'Easy' mode can be used for objects with simple circular orbits, and omits unnecessary parameters from the dialog. To switch between 'Easy' and 'Full' mode, click the "Toggle easy entry mode" button at upper-right of the window. In this example, the button is down, indicating the dialog is in Easy mode.
The panel at the top of the window indicates the object type: Geocentric, Heliocentric, Stellar, or Projection. Selena is a geocentric object i.e. an Earth satellite.
The Name field contains the name of object, in this case "Selena". This name will be displayed in the data tables, tooltips, and so on. The name can also be used in marking-up interpretation texts, in the formulae of Arabic Parts, etc.
Clicking the object's glyph field will display ZET's Glyph Editor window. Here you can choose an existing glyph for the object, or create a new one.
The entryfield immediately at right of the glyph field is a code field that is used only for certain objects, e.g. "Sel" indicates that this object (Selena) is an Avestan object (there being other 'white moons' in Avestan astrology with different parameters).
The three following fields are the parameters required to compute simple (circular) orbits:
- Date: the reference (Epoch) date of the specified longitude (at 0 hour GMT),
- Longitude (degrees): longitude of the object at the reference date (in degrees and
decimals of a degree),
- Period (years): orbital period (in tropical years, with precession).
The Upper option is used for virtual heliocentric planets. A heliocentric object may have two points of orbit with the same longitude. If this option is checked ON, the longitude is used for the far point, if checked OFF it is used for the near one.
When you have finished inputting or editing the data, click the "OK" or "Apply" button, and the object will appear in the listing and on the chart. The "Apply" button leaves the window open, e.g. for fitting of the object's parameters.
More complex cases: 'Full' mode
Some objects have an orbit which differs from circlar and may have an obliquity to the ecliptic. In these cases, the dialog must be used in Full mode. For Proserpine (not the asteroid 26 Proserpina), and after toggling to the correct mode, the Virtual Planets and Objects window looks like this:
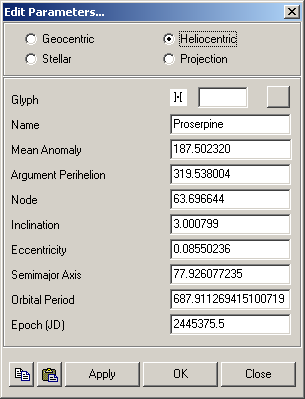
Only astrologers fluent in their mastery of astronomy should attempt to edit the parameters. However, it is possible to exchange the data of virtual objects between ZET users (there are many exotic new objects...). For this purpose, use the Copy and Paste buttons at the bottom of the window.
If you click the "Copy" button, then the following line (in this example) will be saved to the Clipboard buffer:
;;103;Pro;Proserpine;;;187.502320;319.538004;63.696644;3.000799;0.08550236;77.926077235;2445375.5;V;
...and here are the parameters of the geo-stationary Inmarsat satellite used for maritime communications. It seems this satellite cannot be used in astrology, but you may nevertheless want to see how it looks on a chart (its azimuth and altitude are constant):
;;253;;Inmarsat AORE;;;109.6;0;180;23.44583;0;0.00028185007989764;2448830.500;E;
Try copying the above line (select it and type Ctrl+C), and inserting it into the listing using the "Paste" button of the New Object window.
Stellar objects
Objects of this kind include the Sun's Apex (the projection onto the celestial sphere of the point towards which the Sun is moving), and the Galactic Center. The screenshot below shows the parameters of the recently discovered 'diamond' star, named Lucy. According to some astronomers, it is a giant crystal of carbon, i.e. diamond. Some astrologers are attempting to use it for prognostication:
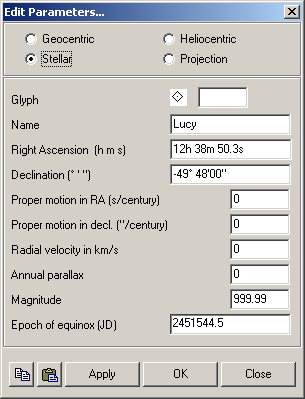
If the object's parameters of proper motion and parallax (distance) are unknown, the corresponding entryfields should be set to zero. If the star's magnitude is unknown, it shoud be set to 999.99.
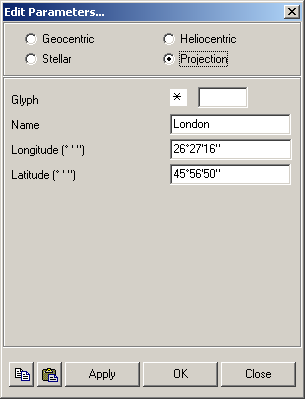
City Projections
There is a techique of mundane astrology, in which a city can be brought into symbolic correspondence with a celestial object whose equatorial coordinates equal the geographical coordinates of the city.
To create this type of object, select the "Add City Projection..." menu item from the Virtual Planets and Objects window. This opens the Atlas. In the Atlas window, find the city, and from the popup menu of the Atlas, select the "Add City to Virtual Objects" item. The coordinates will be calculated automatically.
The data can be edited: