Sky
The Sky tableau (planetarium) is displayed by selected "Tableau" | "Sky" from the main menu,
or by clicking the  "Sky" Toolbar button.
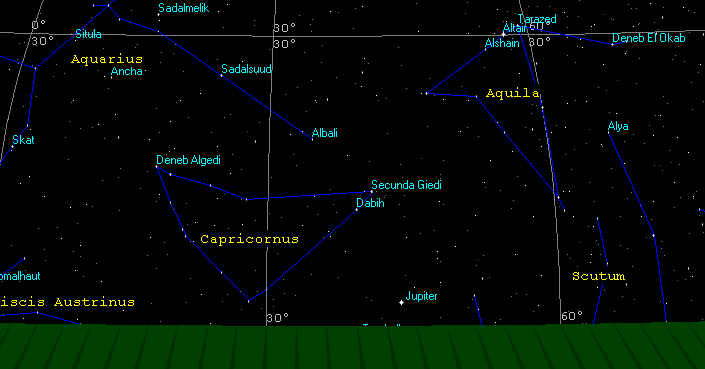
The tableau depicts the celestial vault as a globe that can be viewed - as if in a permanent night-time - from inside or outside, or as transparent, or with a terrestrial landscape horizon (shown below). You can superimpose on the starry sphere various coordinate systems: horizontal coordinates (as an actual observer on the Earth at a given latitude and longitude), or equatorial or ecliptical coordinates. You can also display astrological data to reveal houses and 3D aspects. And you can animate the sky.
When the tableau is first displayed (or redisplayed), it uses the current event-data date and time. This is updated if you use Dynamics of Time or Location operations in the tableau. However, if you select Motion for the tableau (see Sky Settings below), this will not affect the event-data.
Pausing the mouse pointer over any object in the tableau (planet or star) displays its name or designation in a tooltip. Further information is available with the Data option of the Sky Settings window - see below.
To reorient the celestial sphere, click in the tableau and drag the mouse while holding down the mouse button.
You can also use the cursor arrow-keys on the keyboard:
- press the arrow keys alone for smooth movement,
- press the Ctrl key together with the arrow keys for faster movement,
- press the Alt key together with the arrow keys for fastest movement.
- press the Shift key together with the arrow keys for very slow movement.
To magnify the view, click the bullet "Zoom In (PgUp)" and point "Zoom Out (PgDn)" buttons located on the Toolbar, or use the Page Up and Page Down keys.
To locate and view a specific constellation, see Constellations.
To animate the Sky, see Dynamics of Time.
Celestial Sphere Settings
Right-click the mouse in empty space in the tableau to display the Sky Settings window. This dialog can also be opened by selecting the "Settings" main menu item, or by clicking the "Options" Toolbar button, and then selecting the "Celestial Sphere Settings" menu option.
Display tab
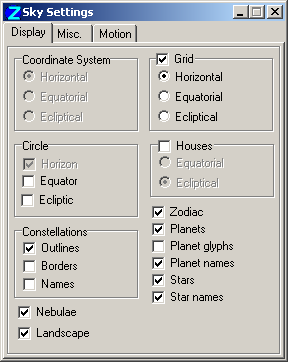
- Coordinate System - selects between horizontal, equatorial, and ecliptical coordinate grids. This option applies only to the full sphere, i.e. when the "Landscape" setting is unchecked,
- Grid - overlays the globe with lines of coordinates. Select the system of grid coordinates using the Horizontal, Equatorial, or Ecliptical buttons,
- Circle - selects the optional display on the sphere of the equator, the ecliptic, and horizon circles.
- Houses - displays great circles of houses on the globe. By selecting different house
systems on the Chart Settings - Houses tab, you can see how
the different systems work and their relationship to astronomical systems of coordinates.
The sub-options set the orientation of the great circles:
- Equatorial - cusp lines are perpendicular to the celestial equator,
- Ecliptical - cusp lines are perpendicular to the ecliptic.
- Constellations - check the separate items on this panel to display constellations' outlines (figures), their IAU astronomical borders, and their names,
- Zodiac - displays zodiac glyphs on the ecliptic circle at the transitions to a new astrological sign,
- Planets - displays the planets on the sphere,
- Planet glyphs - labels planets on the sphere using their astrological glyphs. (The "Planets" option must be checked),
- Planet names - labels planets on the sphere using their names. (The "Planets" option must be checked). If the "Planet glyphs" option has also been checked, glyphs are displayed and planet name info tooltips are enabled,
- Stars - displays stars on the sphere,
- Star names - labels stars with their proper names from the Star Catalog (named stars only),
- Nebulae - displays the galaxies and nebulae in ZET's catalog on the sphere,
- Landscape - displays a terrestial landscape horizon in the tableau. (NOTE: the Coordinate Systems panel options are not available with this setting).
Misc. tab

In the following list of settings on this panel, the items marked with a star (*) are enabled in the full sphere view only, i.e. when the Landscape option of the Display tab is unchecked.
- View* - selects the mode of representation on the sphere: from inside, from outside, or transparent,
- Colors* - selects between a black or white tableau backdrop (the latter is recommended for printing out the tableau graphic),
- Data - when selected, information about objects picked out by the mouse pointer is displayed on the tableau at top-left,
- All asteroids - if the Catalog of Asteroids has been calculated (filled with asteroids coordinates), this option displays the asteroids on the tableau,
- Hipparcos Star Catolog - this option is enabled only if the add-on Hipparcos Catalog has been installed. The setting allows the Hipparcos data to be included in the tableau. If unchecked, the Bright Star Catalog will be used for displaying stars. NOTE: the Hipparcos Catalog is extensive, and its use may slow down your computer unacceptably,
- Aspects* - displays 3D aspect lines. Unlike the natal horoscope wheel, the aspects displayed here are properly three-dimensional,
- Star aspects* - includes planet-star aspects in the tableau. (The option "Aspects" must be enabled),
- Horizon axes* - displays the X/Y/Z reference axes for the globe - west, south, and zenith. The initial origin is the center of the globe, but is relocated if the "Find" option (see below) is used,
- Star/planet name font size - use the spin buttons to select a display size for star and planet name labels,
- Constellation name font size - use the spin buttons to select a display size for constellation names text,
- Minimum star brightness - use the spin buttons to select a value of visual magnitude (m) below which stars will not be displayed. (Note that lower apparent brightness is indicated by a higher numerical value of m),
- Fix Sun - maintains the Sun in a fixed position on the tableau when rotating or animating the sphere. This setting is useful for examining solar eclipses, when the the Sun is the focus of interest.
- "3d-aspects" mini-button - (bottom-left of panel) opens a window listing the 3D aspects. The data can be edited, saved, etc,
- Find - opens the Find Object: window. If the object is known, the globe is rotated to center the object in the tableau, and the horizon axes (see setting, above) are positioned on the object if they are displayed.
Motion tab
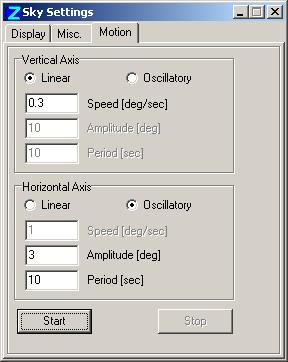
This tab contains settings for animating the image of the celestial sphere. This means that the event data (the current time), and other tableaux reliant on it, are unaffected. (The Dynamics of Time animate the Sky tableau from the point of view of a real Earth observer - when used the event data is updated).
You can set the type and the amount of motion separately in the Vertical Axis and the Horizontal Axis. If selecting Linear motion, you need only set the Speed parameter in the entryfield. When selecting Oscillatory, you can set only Amplitude and Period. It is possible to combine linear motion about one axis with oscillatory motion about the other axis. Oscillatory motion promotes a perspective illusion which may assist viewing 3D aspects.
To rotate the globe when the "Landscape" is enabled, select Linear motion for both axes. Set the Horizontal Axis, Linear speed to 0 (zero). Set the Vertical Axis, Linear speed to, say, 0.3 and click "Start". Observe the limb of the sphere.