Dynamics of Time
In this window you can adjust the current time of the birth or event data in a variety of interactive and systematic ways, to effect corresponding changes to ZET's various tableaux.
The Dynamics of Time control panel is opened by:
- clicking the
 "Dynamics of Time" Toolbar button,
- selecting "Control" | "Dynamics of Time..." from the main menu.
- typing the hot-key 'T'.
Facilties are available to change the time by a constant or dynamically variable amount; manually or automatically; singly or repeatedly. The tableau on display, and open windows with relevant data, are updated automatically as the event data changes.
You can also quickly generate planet return charts here.
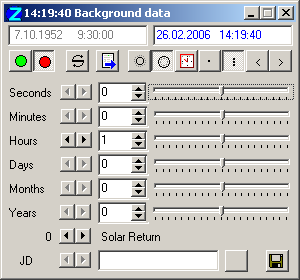
Setting the initial date and timeThe initial dates/times that will be adjusted are shown at the top of window - current core data is at left, background data (if applicable) at right. These date(s) and time(s) are updated after each change that has been made using the Dynamics of Time control buttons. The date and time can be changed by:
- clicking with the mouse in the entryfield, and editing the data directly,
- clicking the "Now"
button, which sets the date and time to the current (real) time
at the user's location.
When the Chart tableau has a dual or complex type chart, you can select which data-set is to be changed by clicking the "Core Data" and "Background Data" buttons. The currently selected data-set is displayed in the title bar.
Setting the periodIf you choose to set a time interval for single-stepping the tableau display, or for animating it, the interval used is the aggregate of the intervals set separately in the entryfields for seconds, minutes, hours, days, months and years. You can set the individual (sub-)intervals by:
- clicking on the spin-buttons (up/down arrowheads),
- typing values into the adjacent numeric entryfields.
Alternatively, if you frequently use a special period, or need to specify fractions of a second:
- click the
 "Set Period..." button
and select one of the predefined periods, or define
your own period. To define your own period, invoke the popup menu
of the Set Period window, and select "New period..." or "Edit
period...",
"Set Period..." button
and select one of the predefined periods, or define
your own period. To define your own period, invoke the popup menu
of the Set Period window, and select "New period..." or "Edit
period...",
- click in the JD entryfield, and type in a value for Julian Days. Then click down the button at right of the entryfield to enable it.
The following controls allow you to manually single-step thru changes of time and to adjust the change of time interactively, e.g. variably and continuously. To repeat quickly a step using the selected interval, click and hold down the mouse button.
- The < "Step Back" and > "Step Forward" buttons step thru changes of time by the aggregated sum of the individual time entryfield setting. The absolute numeric value of the total is used,
- The
 "Reverse" button changes the sign
of the time interval, thus allowing the direction of
time to be readily changed from forwards to backwards and vice versa,
"Reverse" button changes the sign
of the time interval, thus allowing the direction of
time to be readily changed from forwards to backwards and vice versa,
- The left- and right-arrowhead buttons beside each entryfield execute a time step of the unit indicated for the adjacent entryfield,
- The sliders dynamically adjust the time in proportion to the distance traveled from their central position, in units of seconds, minutes, hours, etc. (Entryfield settings are ignored). The sliders are self-centering: if the travel is exceeded, the slider button (and mouse pointer) are reset, but if the time has altered, the new time is retained,
- If a Julian Date has been set and enabled, the JD buttons step the time by the amount specified in the entryfield,
- If a return chart has been cast, the
control panel includes special buttons to step forward and back
to the dates of successive or previous Solar, Lunar
or planet returns (the buttons are not visible if this chart type has not
been cast). The return number adjacent the left button is incremented as returns are found -
the return immediately before the event is numbered 0, the one previous is -1, the upcoming
return is +1, and so on.
NOTE 1: As returns may coincide with retrograde motion, the index displayed is not necessarily an indicator of orbital revolutions.
NOTE 2: The date of event (background date) does not change in the control panel when returns are calculated. To see the actual date of the return, open the Reference Date window by selecting "Reference Date" from the chart tableau popup menu.
Automatic computer stepping (animation) of time changes is operated with these controls:
- The "Animate" (green light) button both starts and stops computer animation,
- The "Reverse" button reverses the sign of the time interval, thus allowing the direction of time to be readily changed from forwards to backwards, and vice versa,
- The rate of time stepping, and the resulting speed of animation of the tableau, can be adjusted by inputting a value into the "Delay [msec]" entryfield, which effects a pause between steps.
The Dynamics of Time can be operated with the window minimized: see Hot Keys.