General Configuration
ZET has an advanced system of settings and adjustments - parameters for calculation, sizes and colors of chart elements, choice of interpretation texts, etc. Alternative settings and adjustments may be desired for different tasks. To facilitate your operation of ZET, entire program settings can be saved in special configuration files, and quickly retrieved as you need them.
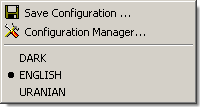
Creating and selecting configurations is carried out from the Configuration menu, which can be accessed by:
- clicking the
 "General Configuration"
Toolbar button,
- selecting "Control" | "Configuration" from the main menu.

The Configuration menu contains predefined (shipped) configurations, and any additional configurations saved by the user.
Saving user configurations
To save the current program settings as a configuration, invoke the Configuration menu and select the
 "Save configuration..." option.
A File Save dialog is displayed for you to name the configuration.
You are advised to create your own configuration files, rather than save current settings to the predefined ENGLISH.ini and URANIAN.ini files, since these are used in an emergency to restore a damaged current configuration.
The Configuration files
- Main.ini - current configuration file, located in the ZET installation folder. At start-up the initial settings are read from this file, and at exit this file contains the final settings of your session.
- The English language interface configuration files are located in [ZET]\LANGUAGE\English\Config folder as .ini files (and correspondingly for other languages).
Configuration Manager

The Configuration Manager feature (in ZET Geo only) allows you to set up automatic connections between configurations and the different horoscope chart types. Various levels of linking are possible:
1) At the simplest level, you can retain your current configuration irrespective of the chart type you select. (No linkage between chart type and configuration). To retain this mode, select Current configuration only.
Otherwise, to effect linking of configurations and chart types, set the Chart-type dependent configurations radiobutton.
2) At the next level of linkage, you can assign a different configuration to single (natal), horary, and dual/complex chart types (as a class), and the selected configuration is applied automatically to each type of chart. Select the configuration to use in each case from the three drop-down lists. Note that at this level one configuration serves for all types of dual and complex chart.
3) Further specialized linkages are available when the option Defined in Dual Chart Editor on the Dual/Complex panel is set. Each type of dual chart can then be linked to a different configuration. The link is created in the Dual Chart Editor. In the absence of a specific link, ZET resorts to the linkage at (2) above - you can thus also select a default configuration from the drop-down list in the Dual/Complex panel when setting up specific linkages.
The Configuration Manager also controls usage of configurations in two other situations:
4) When a chart is cast,
its configuration is entered in the History log along
with the chart details. To retain the original
configuration when a chart is
retrieved, set the Use History's configuration option.
If the option is unchecked, charts selected from the History list will adopt the current configuration.
5) Select Use Shortcut's configuration to
have charts in the Shortcut repository restored with their original
configuration; otherwise a chart restored from the Shortcut
repository will use the configuration that is in effect on
the tableau.
The Horoscope Wizard does not use the Configuration Manager logic.
In emergency
It is possible that after a software or hardware malfunction of the computer, the file Main.ini may be damaged to the extent that ZET cannot be restarted. If this occurs, delete the file Main.ini located in the ZET installation folder, referred to in this Manual as [ZET]. By default this is the "C:\Program Files\ZET 9" folder. ZET will restart using the initial ENGLISH configuration, restoring it by default. If you had previously customized settings you will need to reenter them.
It is strongly recommended that you configure Windows on your computer so that the extensions of file names (i.e. the characters after the right-most dot in a file name) are visible.
If you find a problem with ZET and require advice from the developer, send an e-mail with a description of the problem together with copies of the files Main.ini and, if available, zetstart.log to the e-mail address in the About... window.