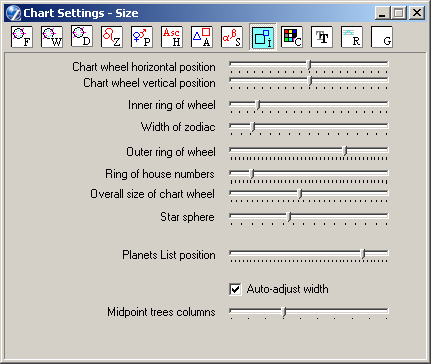
Chart Settings - Size
The Chart Settings window consists of several thematic tabs of options for calculating and displaying horoscope charts. The Size tab contains options for setting the dimensions and position of the chart wheel, and the width of the information column at right of the tableau. (To show or hide these components of the tableau, see the options on the Wheel and Data tabs).
The Chart Settings - Size tab is opened by first:
- selecting "Settings" | "Chart Settings" from the main menu, or
- clicking the
 "Options" Toolbar button
and selecting "Chart Settings..." from the menu, or
- right-clicking in the Chart tableau and selecting "Chart Settings..." from the popup menu, or
- double-clicking in an empty region of the Chart tableau.
Then by clicking the "Size" button
at the top of the window, or typing the 'I' key.

The scrollbars can be set using the mouse by dragging the slider control, or by clicking at the desired position on the slider track. The sliders can also be moved in small increments with the right- and left-cursor keys. Changes are immediate. Select sizes and proportions ad lib.
- Chart wheel horizontal position, and
- Chart wheel vertical position - you can also position the chart wheel with the mouse:
press and hold the Shift key, click the main mouse button
in the central (aspect) region of the wheel, and drag the wheel to its new position
while holding the mouse button,
- Inner ring of wheel - alters the size of the inner disc, in which aspects lines, etc are displayed,
- Width of zodiac - alters the width of the zodiac belt of the wheel,
- Outer ring of zodiac - alters the outer diameter of the wheel,
- Outer ring of wheel - alters the size of the (imaginary) ring in which cusp numbers are displayed,
- Overall size of chart wheel - scales the chart wheel in proportion.
You can also resize the wheel using the mouse:
press the Shift key, and while holding it down, click the main mouse button
in the zodiac belt, and drag it while holding the mouse button down
to achieve the desired scaling,
- Star sphere - adjusts the distance of the ring of stars from the center of the wheel
(if star display has been set),
- Planets List position - alters the space allocation given to the planets listing
and related information blocks at the right side of the tableau.
You can also set this allocation using the mouse (after unchecking the Auto-adjust width option):
press the Shift key, and while holding it down, click the main mouse button
in the planets listing, and drag it, while holding the mouse button down,
- Auto-adjust width - when checked, the Planets List is displayed flush right on the tableau.
When unchecked, the data is allowed to flow off the right side of the tableau.
NOTE: checking this option slows down the program,
- Midpoint trees colums - sets the number of midpoint trees that will be displayed in one row of the midpoint trees listing (see also the Midpoint trees option on the Format tab).