Atlas Editor
The Atlas window menu in ZET Pro and Geo contains additional functions for editing the main Atlases. (These functions are not implemented for World Atlas II).
Atlas exchange format
The World Atlas (and the Big Atlases) are in the [ZET]\ATLAS folder. Each one
consists of 6 files:
Xc.dat - list of locations and other data,
Xe.dat - list of English names,
Xr.dat - list of Russian (national) names,
Xoe.dat - English sorted order reference list,
Xor.dat - Russian sorted order reference list,
Xp.dat - search pointer list,
where X is an internal name of the Atlas - 'City' for the World Atlas, 'RU' for the Russian
Big Atlas, etc.
This structure was developed for accelerated performance from various functions of the atlas and minimisation of size.
The internal format used by atlases can be converted to, and from, a text interchange format. An Atlas in the interchange format is a single file X.txt, where X is the name of the Atlas. Here is a short fragment from an interchange format Atlas:
C Code Latitude Longitude Reg AD TB SZ - ----- ---------- ----------- ---- -- -- -- P;PPL ;61°13'05"N;149°54'01"W;USAK; ;Es;03;Anchorage;Ŕíęîđčäć;;; P;PPL ;17°32'00"S;149°34'00"W;PF ; ;(A;33;Papeete;Ďŕďŕĺňĺ;;; P;PPL ;54°19'00"N;130°19'00"W;CABC; ;-T;03;Prince Rupert;Ďđčíö Đóďĺđň;;;
C Code - feature class and code, see PUBLIC NIMA GNS FEATURE DESIGNATION REFERENCE,
Latitude and Longitude,
Reg - region code, see Country Codes and codes of regions (states, provinces),
AD - ADM code (not used),
TB - code of time zone table, see correspondence of code and table name in the file ZET\Zones\index.dat.
SZ - encoding of the city name display position and the relative city size.
First digit:
0 - name located top-right from the city mark on the Geographical Map
1 - bottom-right
2 - bottom-left
3 - top-left
Second digit:
1 - biggest city
...
7 - smallest settlement
8 - synonym
9 - deleted (temporary)
English name,
Russian name - optional, inaccessible in English version,
skip - not used,
Dimension - number of city inhabitants, or height of mountain (optional).
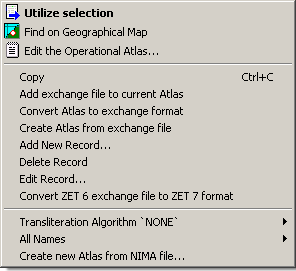
Atlas Editor functions
Add exchange file to current Atlas - used for bulk insertion of additional cities into the Atlas. You need to have prepared a list of cities in interchange format.
Convert Atlas to exchange format - used for bulk editing of the Atlas. Selecting this menu option displays a confirmation message: "Convert Atlas to exchange file ATLAS\City.txt?". If you select "Yes", the file City.txt is created. Satisfactory completion is indicated by the message "Well Done".
Create Atlas from exchange file - creates 6 internal format Atlas files from a specified interchange format file. A File selector dialog is opened for selecting the file to process. Existing Atlas files are overwritten by the new Atlas.
Add New Record... - for adding a single city to the Atlas. The following dialog is displayed:
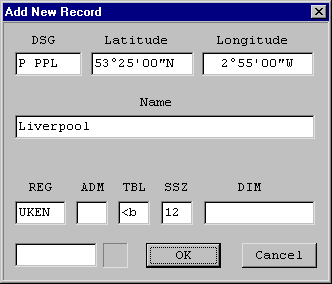
Complete the fields (they are described above), and click OK. You can obtain the required TBL code from the Atlas by inspecting the data for an existing near-by city in the same administrative area.
Delete Record... - if you're sure!,
Edit Record... - for editing a single city in the Atlas. The following dialog is displayed:
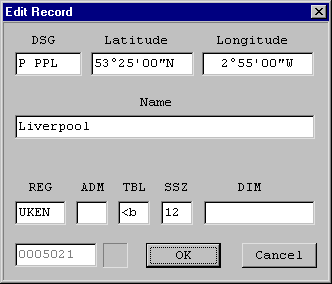
Complete the fields (they are described above), and click OK. The procedure may take some time, while ZET reoptimises the Atlas files.
Convert ZET 6 exchange file to ZET 7 format - obsolete.
Creating a Big Atlas
The Big Atlases are accessible only in the Geo version of ZET.
The Atlas window menu includes functions for creating a new Big Atlas from files in NIMA format. Let's consider as an example creating the Big Atlas for Australia. To do this:
- Download from NIMA at
http://www.nima.mil/gns/html/, or via FTP from
ftp://ftp.nima.mil/pub/gns_data/
the as.zip file for Australia, extract the as.txt file, copy it
to the [ZET]\ATLAS\ folder and rename it there as AU.tmp.
ZET country codes may differ from NIMA ones,
- Open the URL at http://gnswww.nga.mil/geonames/GNS/index.jsp,
select "ADM1 Codes" menu item, input "AS" as Australia country code and obtain the admin. codes list for Australia:
AS 00 Australia (general)  1 - Americas/Western Europe

AS 01 Australian Capital Territory  1 - Americas/Western Europe

AS 02 New South Wales  1 - Americas/Western Europe

AS 03 Northern Territory  1 - Americas/Western Europe

AS 04 Queensland  1 - Americas/Western Europe

AS 05 South Australia  1 - Americas/Western Europe

AS 06 Tasmania  1 - Americas/Western Europe

AS 07 Victoria  1 - Americas/Western Europe

AS 08 Western Australia  1 - Americas/Western Europe
- Open the [ZET]\Zones\index.dat file and copy this part for Australia:
!LAUST-ACT

!MAUST-BH

!NAUST-LHI

!OAUST-NSW

!PAUST-NT

!QAUST-QLD

!SAUST-SA

!TAUST-TAS

!UAUST-VIC

!VAUST-WA
The first two characters constitute the Time Zone table code,
- Use these sources to create the following text:
01 AUAC !L Australian Capital Territory

02 AUNS !O New South Wales

03 AUNT !P Northern Territory

04 AUQL !Q Queensland

05 AUSA !S South Australia

06 AUTA !T Tasmania

07 AUVI !U Victoria

08 AUWA !V Western Australia
Note: if you wish you may not write letters codes, but leave these digital codes, e.g. AU01 except AUAC.
Save it as AUmerk.txt file in the [ZET]\ATLAS\ folder.
This file will used to create ZET Atlas region codes and links to the Time Zone tables via NIMA administrative codes.
- Open the ZET Atlas window, invoke the popup menu and:
- Select "Transliteration Algorithm..." | "None". (The other items are used only in the
Russian version of ZET for the automatic transliteration of English names to Russian),
- Select "All Names" | "Populated Places Only" to extract only cities from the gazetteer,
or the "All Names" submenu option to use all objects,
- Select "Create New Atlas from NIMA file", and in the File selector dialog select
the AU.tmp file,
- After several minutes the Australian Big Atlas will be created,
- Restart ZET,
- Open the Atlas window, click in the Atlases list, select the "AU Australia" item,
and examine the gazetter entries,
- In the Geographical Map tableau zoom in on Australia, open the Geographical Map Settings window, select the "AU Australia" item, checkmark on the option "Cities from Big Atlas", and examine the map.